Ever asked yourself:
"Where can I find the necessary instance parameters for ADT’s on AWS EC2?"
This tutorial deals with the creation of instances in AWS EC2. Depending on the infrastructure, an ADT needs different information, instance options and worker node configuration to start instances. The tutorial uses examples to show how and where the required information is provided.
IMPORTANT: ADTs deployed via AWS EC2 is free to use Occopus or Terraform as MiCADOscale’s cloud orchestrator.
1. Description of the instance options:
As shown inside the documentation, the cloud orchestrators Occopus and Terraform provide various options to configure instances in an ADT. The following part of this document should give you a brief explanation about these.
region_name (required):
Specifies the physical location of the hardware to be used to run your applications. Amazon EC2 offers 25 different regions.
image_id (required):
Specifies the base image to be loaded for the virtual machine. Amazon EC2 uses so-called AMI‘s (Amazon Machine Image) to provide instances. These contain among others:
- The operating system
- Possible applications
- Startup authorizations (Which AWS user type has the authorization to execute?)
instance_type (required):
Specifies the hardware performance of Virtual Machines. Depending on the use case, the requirements for the planned system at the hardware level (CPU, RAM, Network) may vary. The current generation of Amazon EC2 instance types covers 5 different application areas:
- general purposes (82 different instance types)
- data processing (30 different instance types)
- memory-optimized (74 different instance types)
- storage optimized (23 different instance types)
- accelerated computing (GPU, etc.)(22 different instance types)
key_name (optional):
To establish an active connection with a machine, you must store an SSH key on the machine. Amazon EC2 offers users the possibility to generate these keys via the user interface or to import existing keys.
security_group_ids (optional):
To provide the best possible protection for your virtual machine, all ports on newly created machines are closed by default. To open the ports you need on your worker nodes, you need to set up a security group in EC2. These virtual firewalls allow you to configure rules for inbound and outbound connections.
subnet_id (optional):
To separate your Amazon Cloud environment from others, so-called VPC's (Virtual private clouds) are defined under EC2. These serve to shield projects within your Amazon account.
2. EC2 worker-node configuration:
Your worker nodes should have the following specifications:
- Deployment_id: Your worker nodes require Ubuntu_18.04
- Instance_id: Your worker nodes require a minimum of 2 Cores and 4GB RAM
- You want to access your machines via SSH
- Besides the ports required by MiCADO’s worker nodes, the ports "443" & "30010" should also be open.
- Region_name: „us-east-2“
To meet these specifications, a lot of input has to be provided in the ADT. In the following, we will show you the exact locations of this information and how you can retrieve the inputs to be used inside your ADT.
region_name:
Required: You want to use “us-east-2”
To find out the name of the region you have chosen, you simply need to check the URL of your AWS management console (1). You can copy this directly from the URL line and paste it into your ADT.

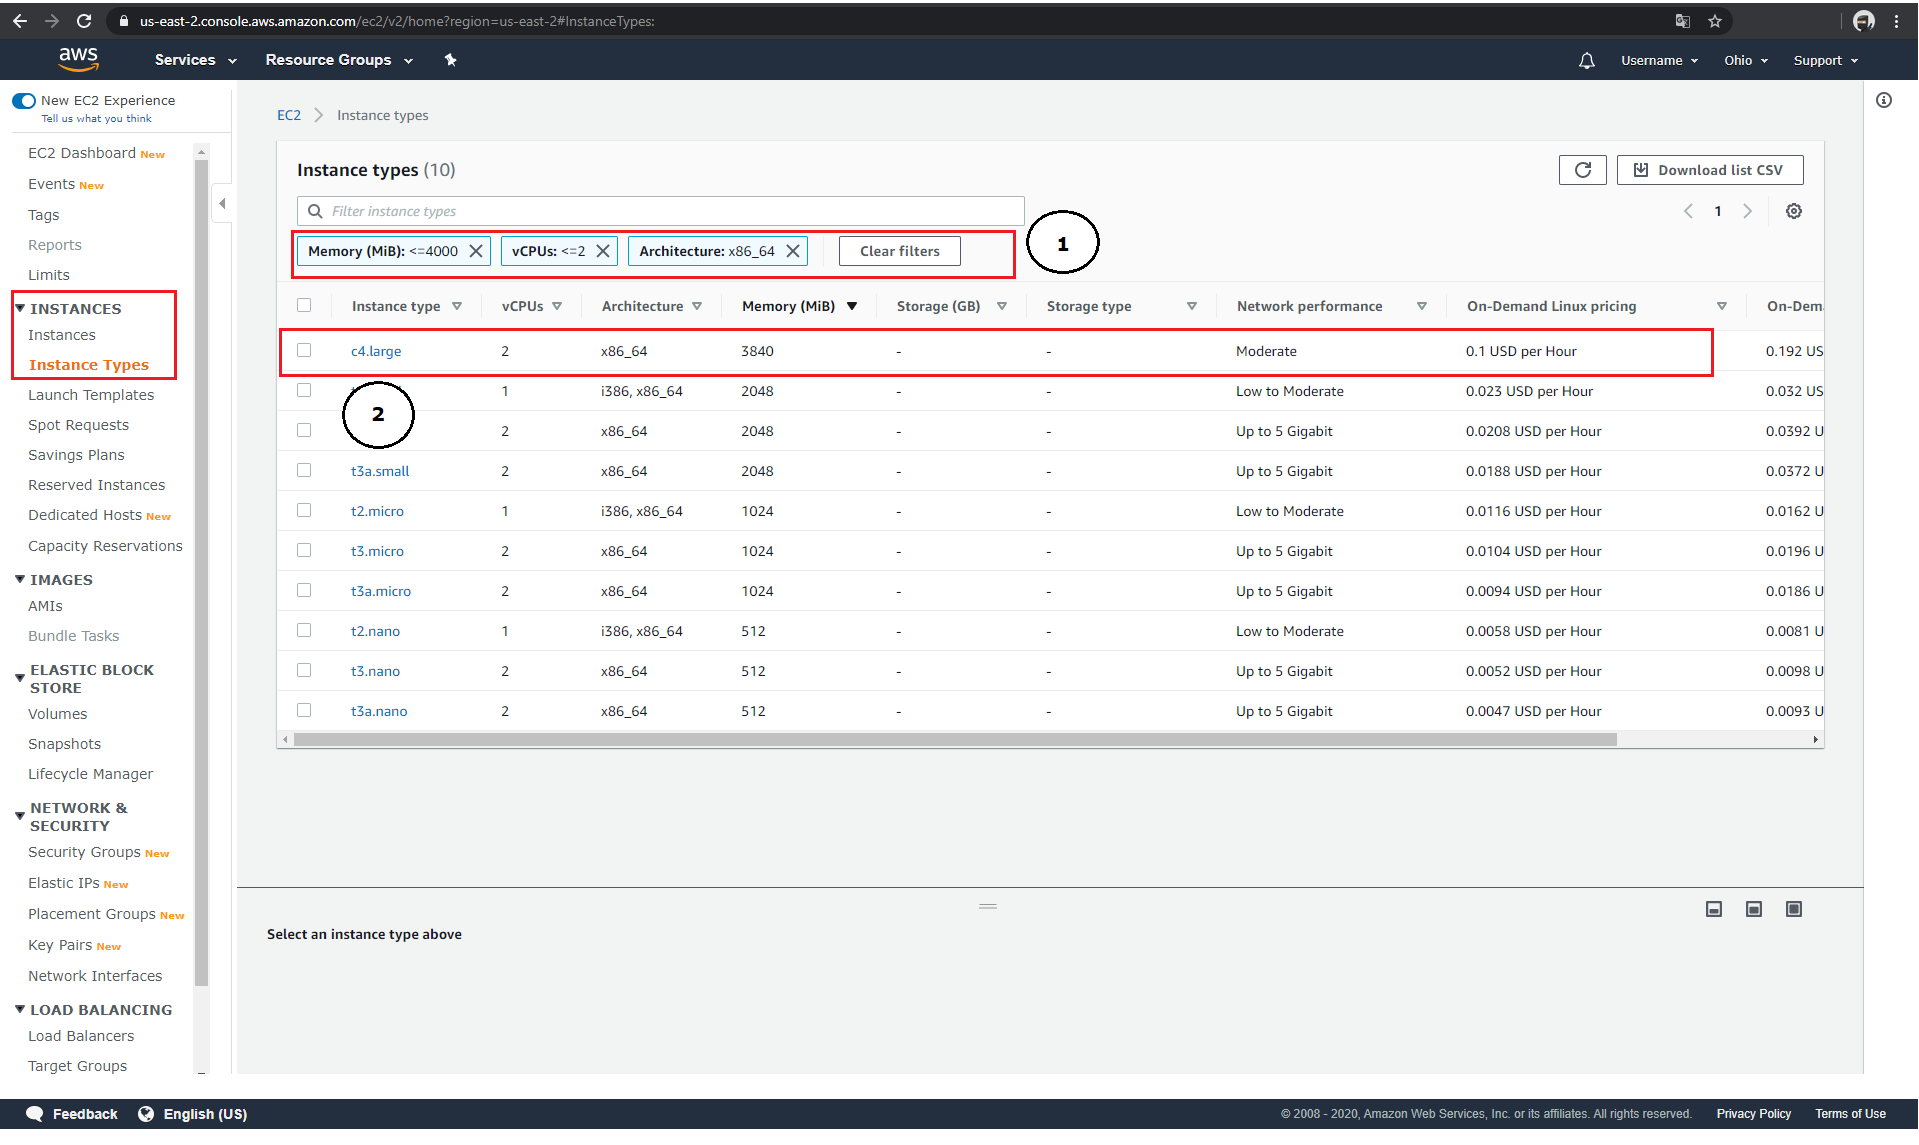
instance_type:
Required: Your worker nodes require a minimum of 2 Cores and 4 GB Ram
To configure the virtual instance hardware, Amazon-EC2 offers a search mask under the menu item "Instances" → "Instance Types". Within this mask, it is possible to filter the list according to certain parameters. In the scenario described above, it is possible to filter the list according to the individual hardware components (1). After you have identified the instance type of your choice, copy its name from the field "Instance type" (2) and use it within your ADT.
image_id:
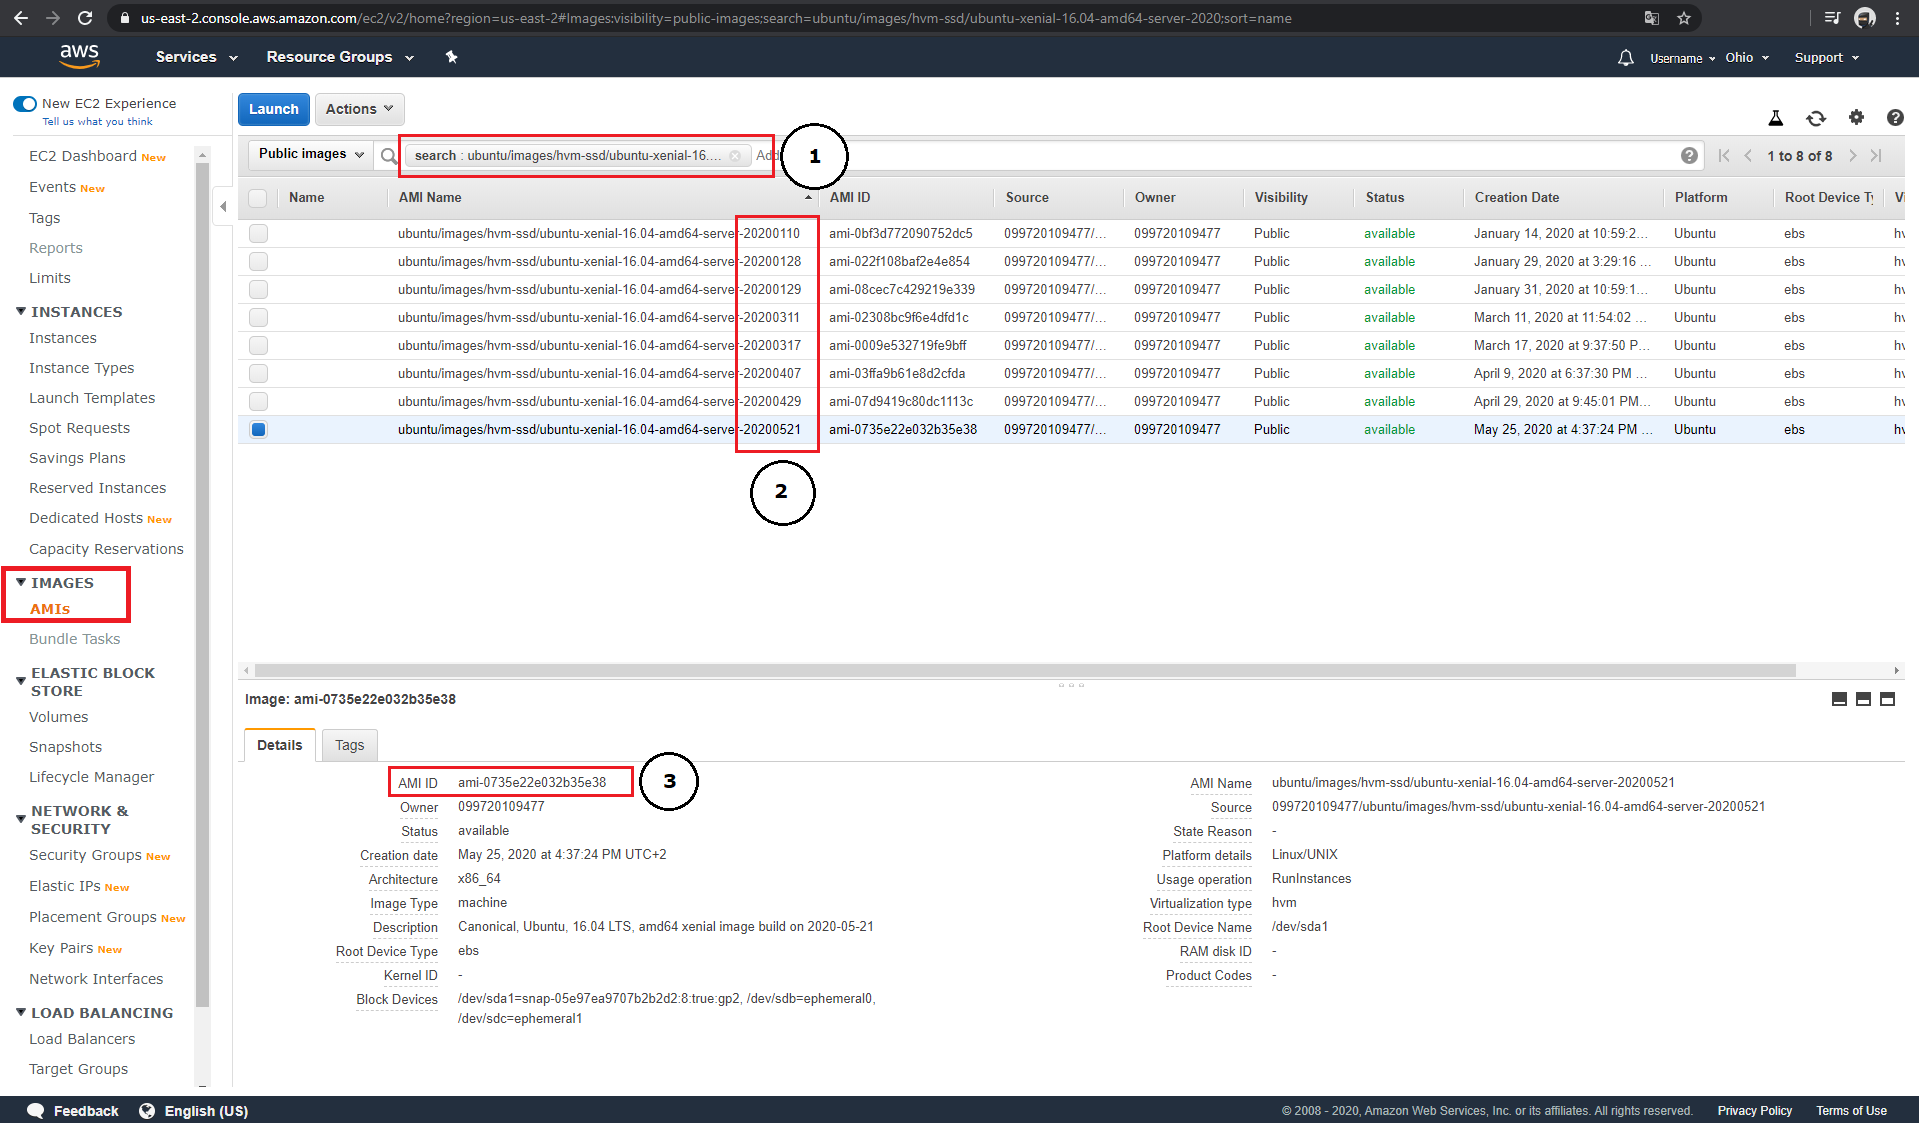
Required: Your worker nodes require Ubuntu_18.04
To find a specific AMI, Amazon-EC2 offers a search mask under the menu item "Images"→ "AMIs". In the case of Ubuntu images, it is possible to access the images provided by Amazon via their name (1). The formatting of the name allows to search for different releases, architectures and release dates (2).
Example:
Ubuntu 16.04 → all builds from 2020
ubuntu/images/hvm-ssd/ubuntu-xenial-16.04-amd64-server-2020
Ubuntu 18.08 → all builds from 2020
ubuntu/images/hvm-ssd/ubuntu-bionic-18.04-amd64-server-2020
Since this search mask also lists registered images from third parties, you should only use trustworthy images.
Click on the AMI of your choice to open a detailed view in the same window. If you move the mouse pointer over the sub-item "AMI ID"(3), you can automatically copy it to your clipboard with one click. The AMI copied in this way can be used within your ADT.
key_name:
Required: You want to access your machines via SSH
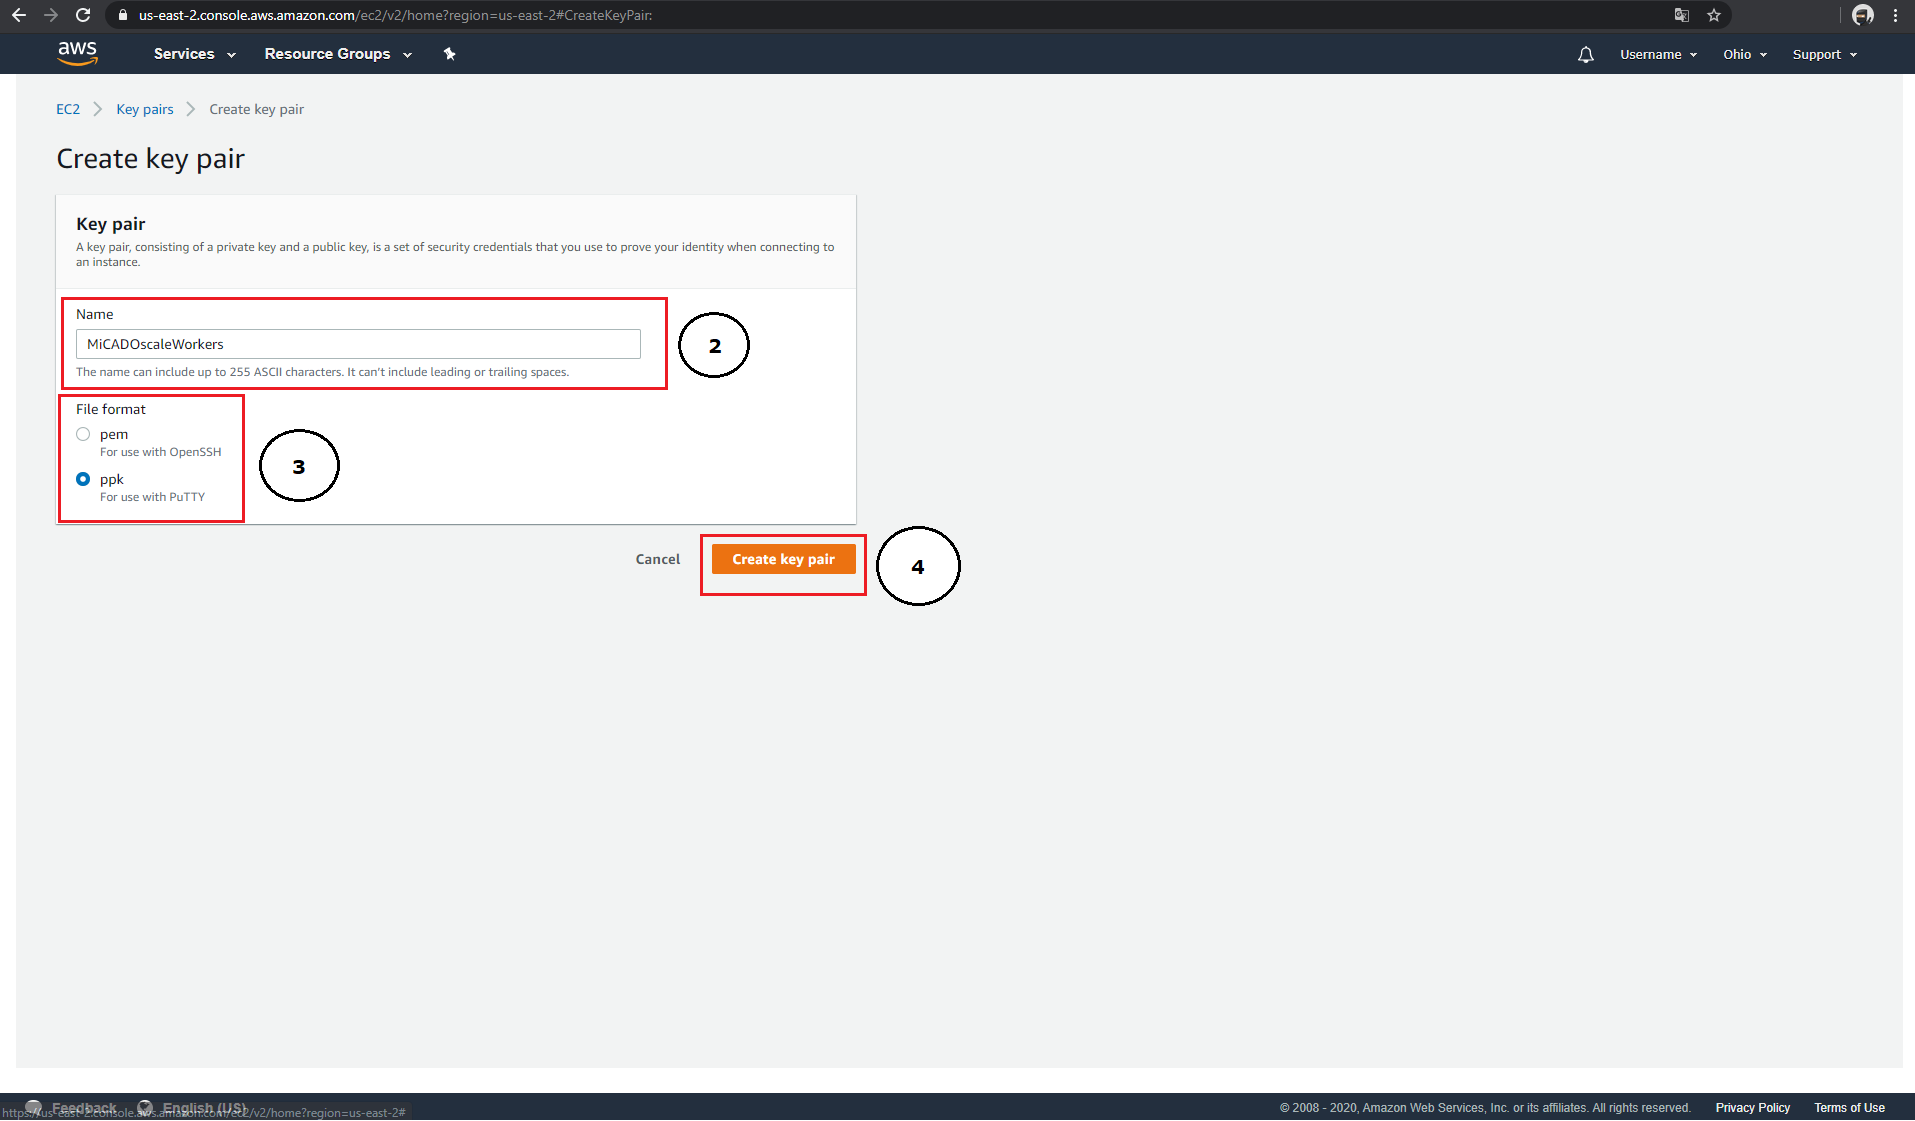
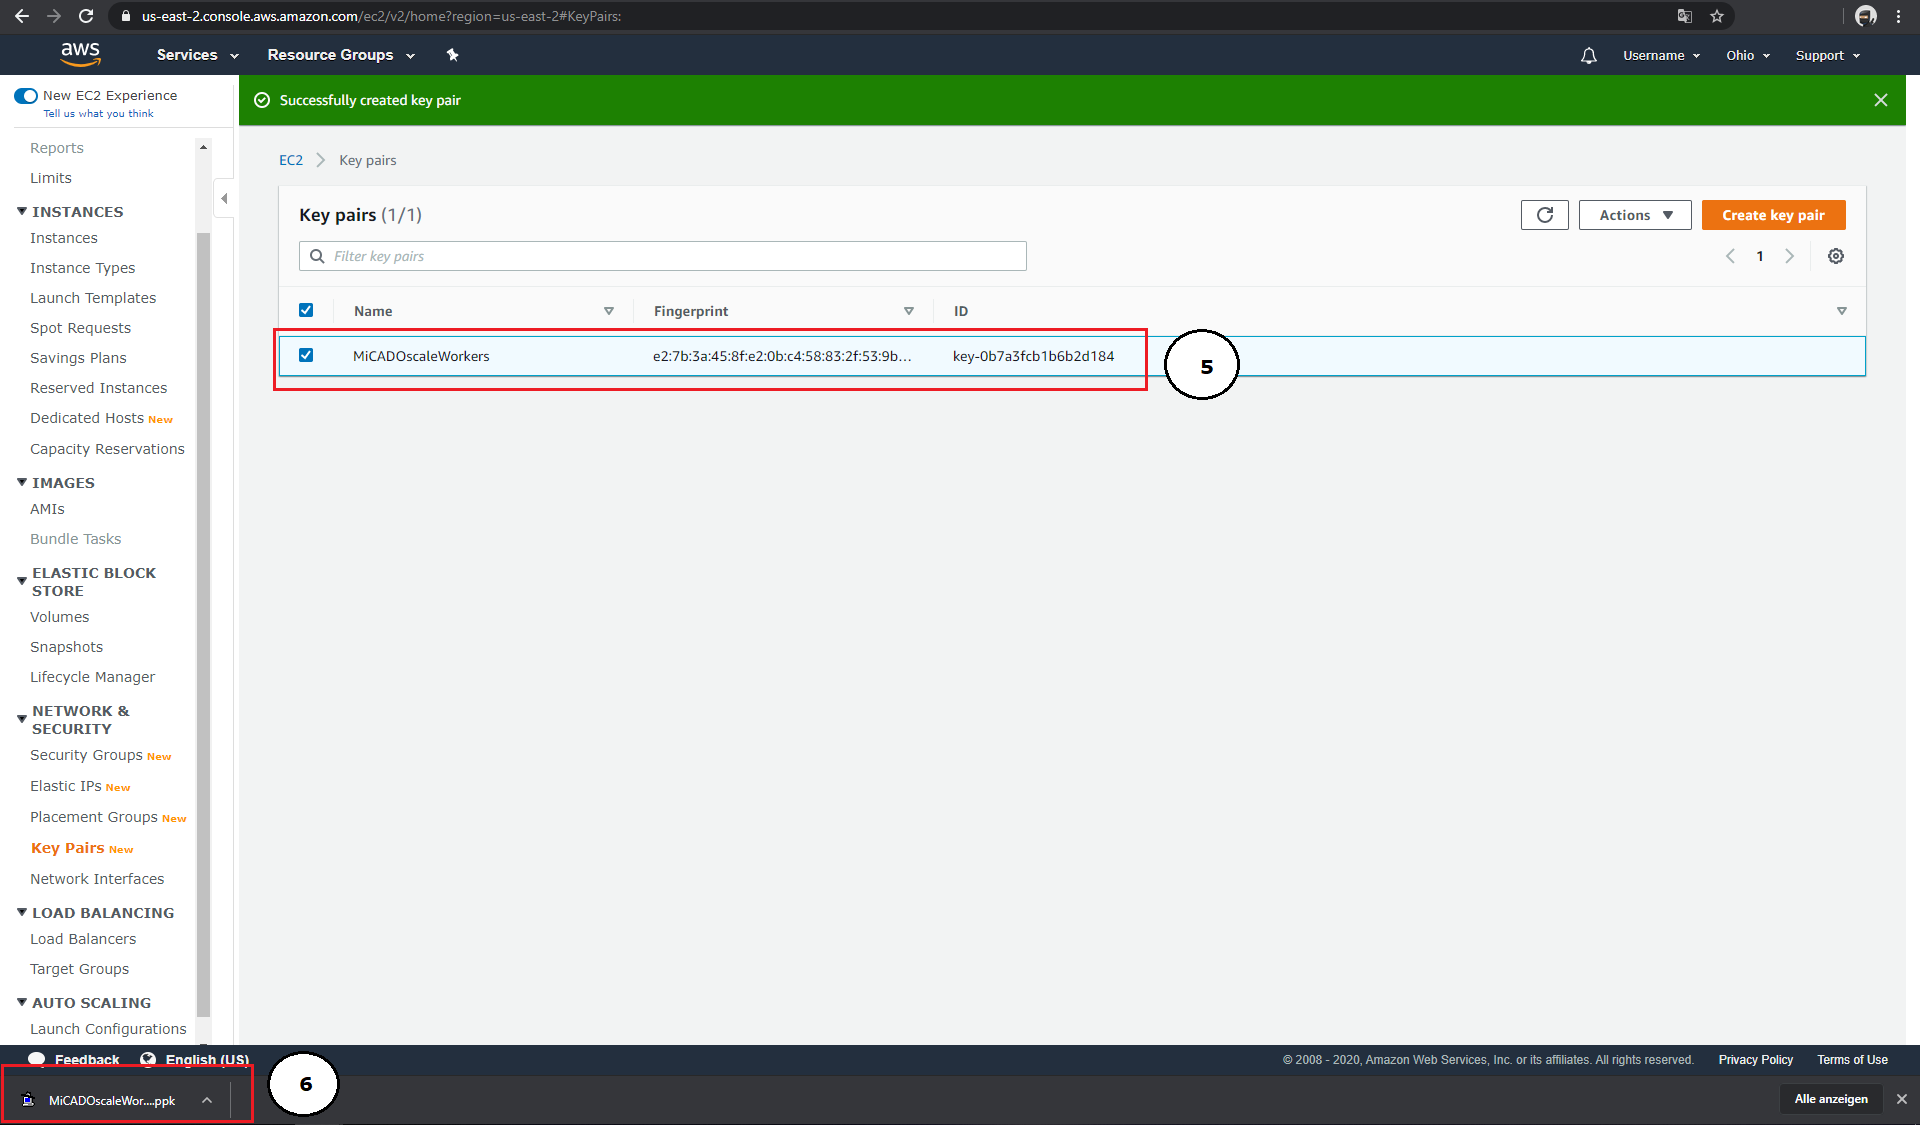
Amazon-EC2 supports importing or creating new SSH keys. Under the menu item "Networking & Security" → "Key Pairs" you have the possibility to create a new SSH key via the button "Create key pair" (1).
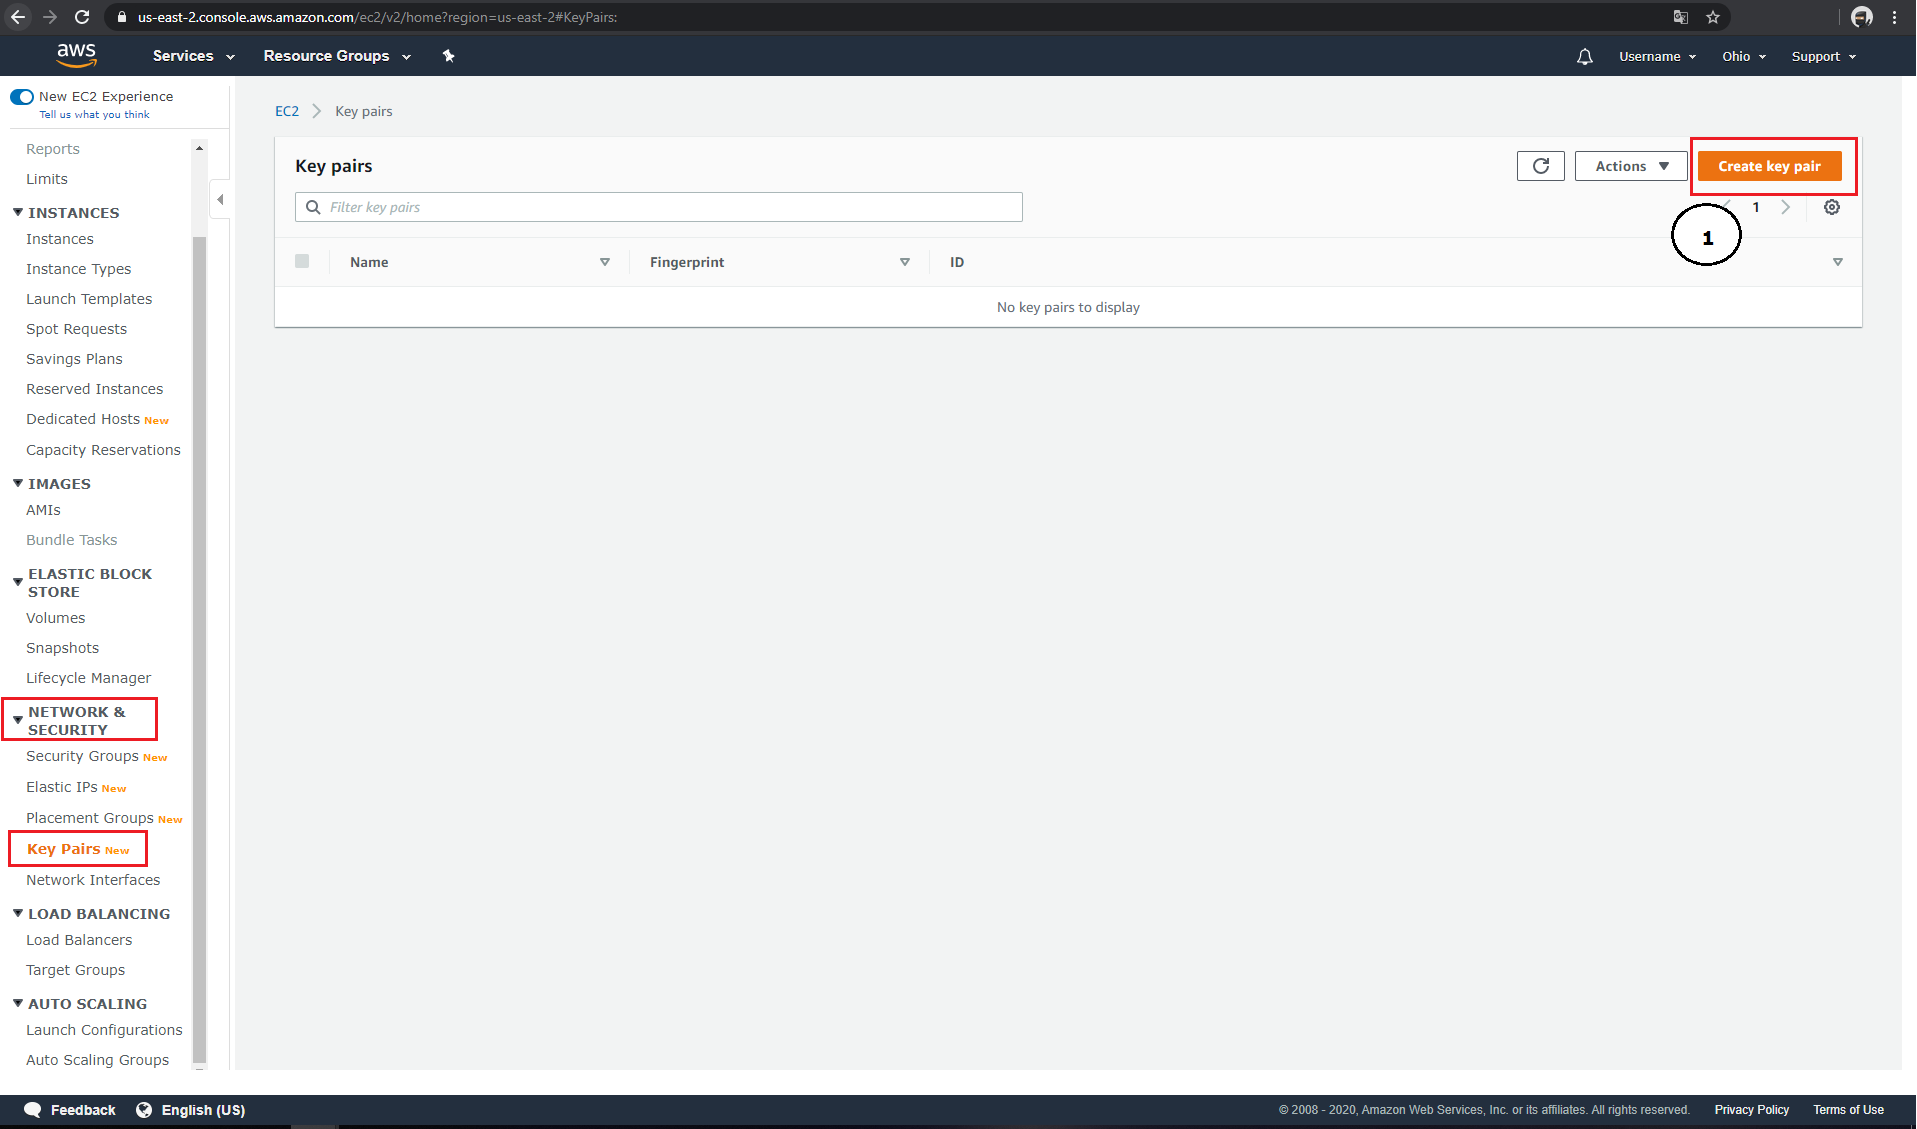
Each key created in Amazon-EC2 must be given a name (2). This name can be used later in your ADT as "key_name" parameter. Amazon-EC2 offers either the ".pem" format (for use in OpenSSH) or the ".ppk" format (for use in PuTTY) for exporting keys (3). After clicking on "Create key pair" (4), your public key will be added to the list (5), and your private key will be automatically downloaded (6).
subnet_id:
The VPC-ID can be taken from the detail view for the security group you created (1). Virtual private clouds are automatically created when you start a new instance on Amazon-EC2 for the first time.

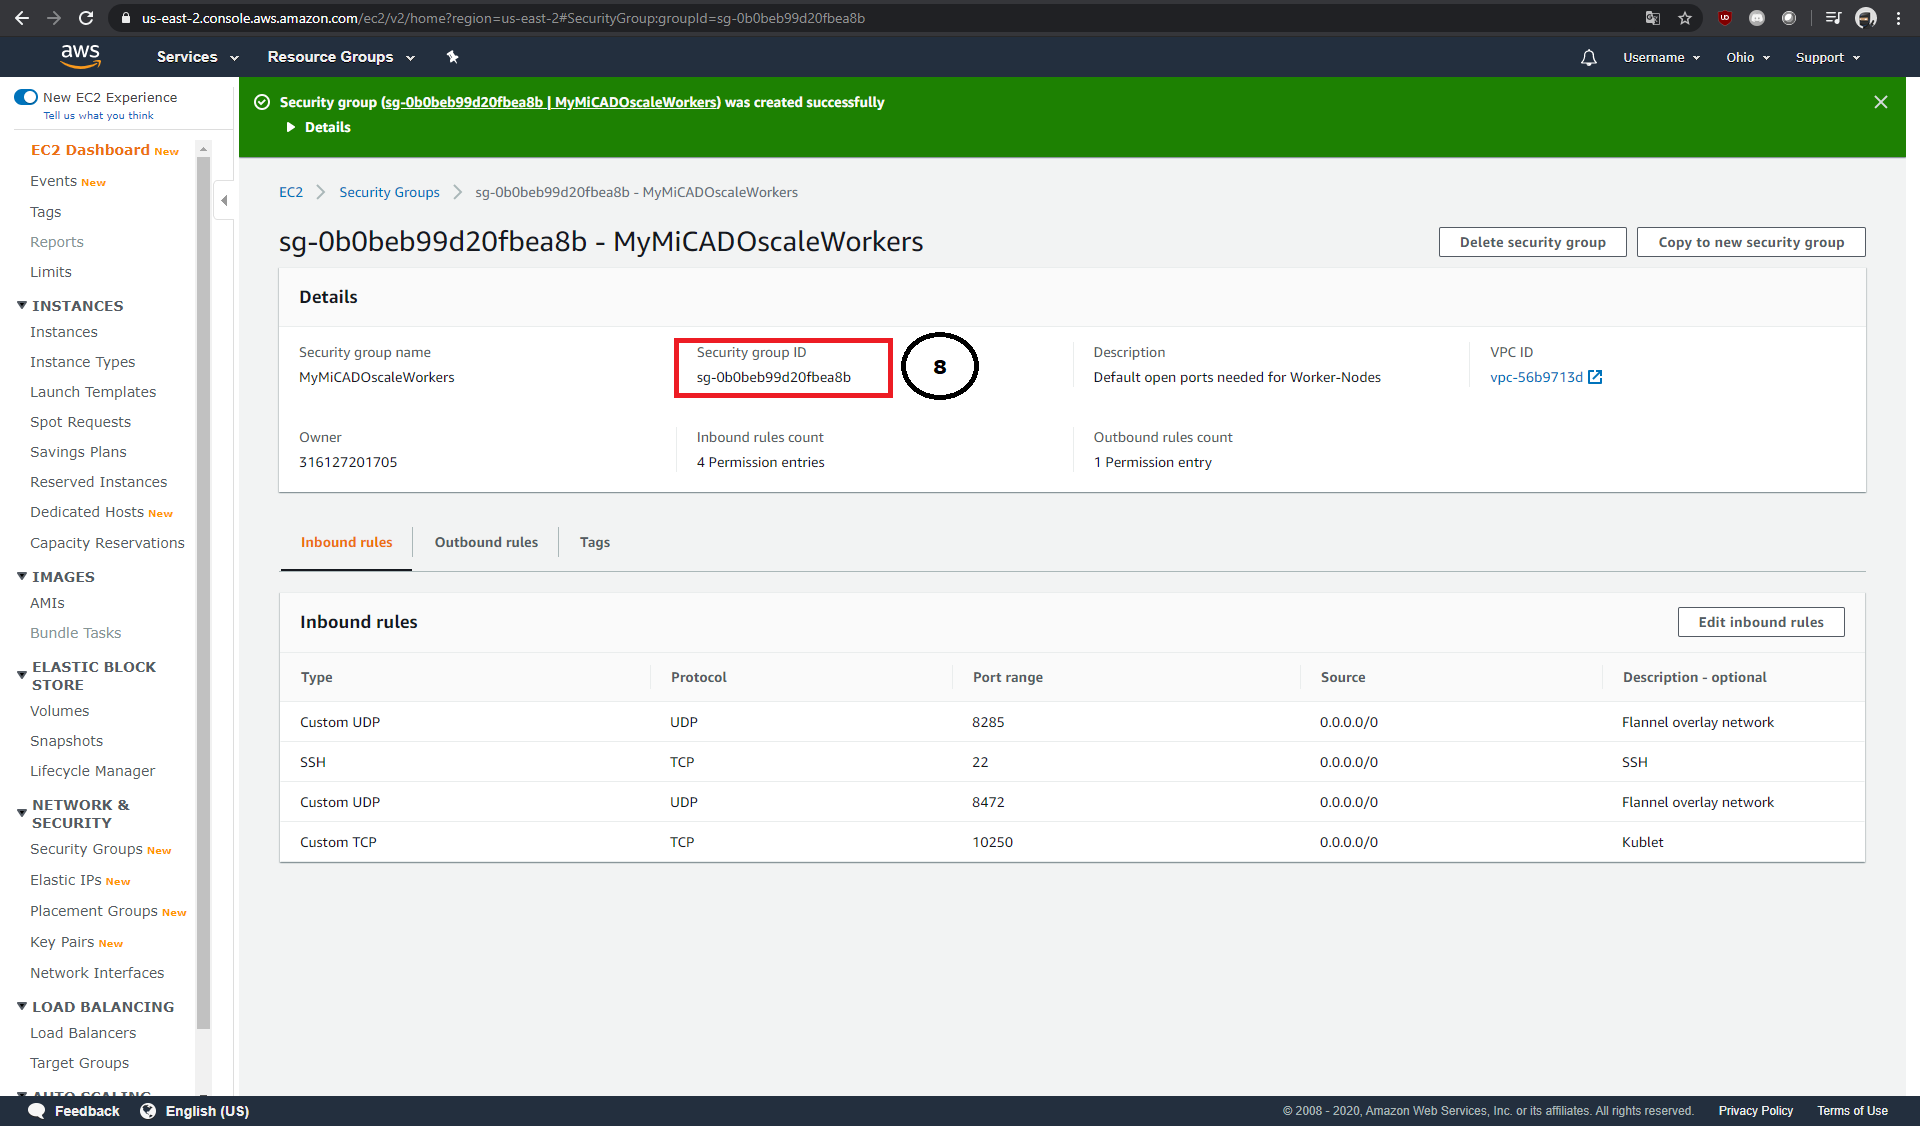
security_groups_ids:
Required: Besides the ports required by MiCADO’s worker nodes, the ports "443" & "30010" should also be open.
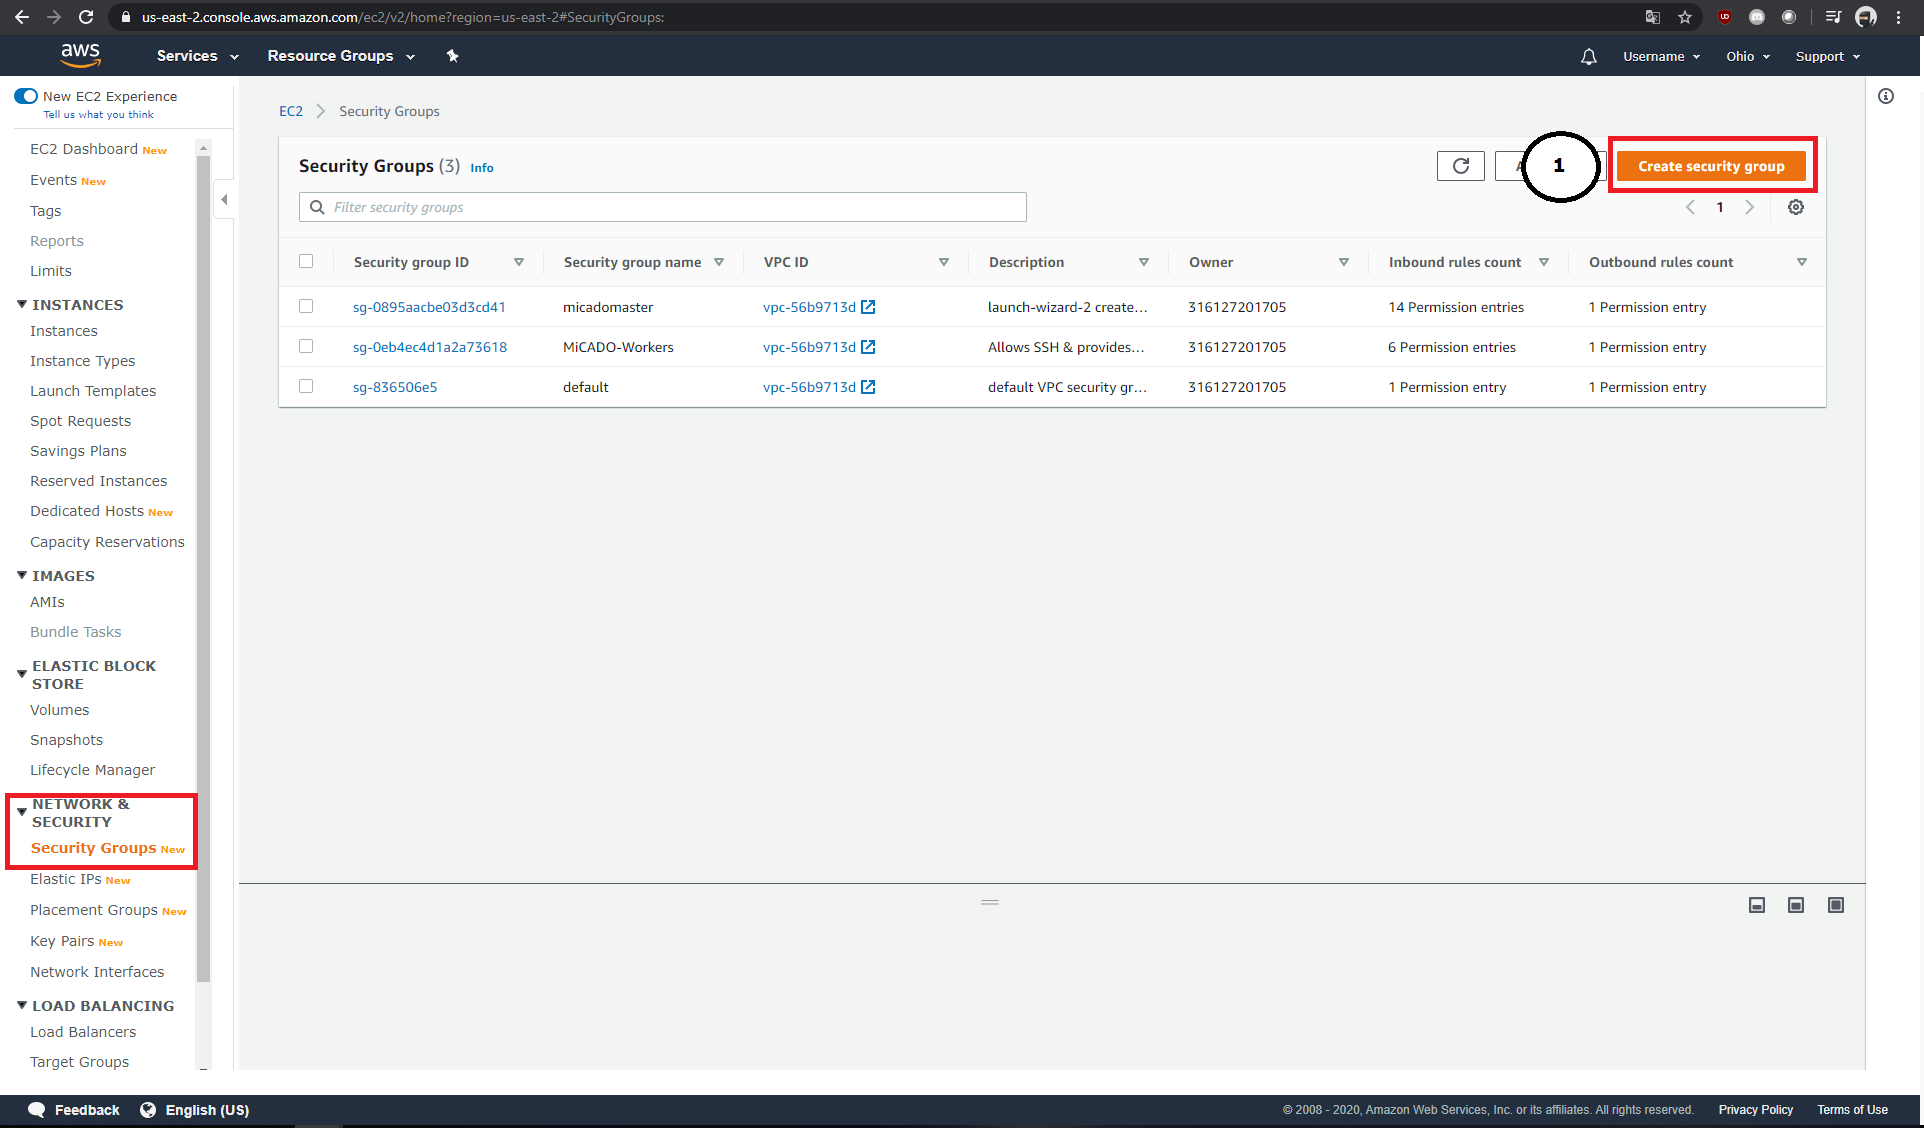
Within the menu item "Network & Security" → "Security Groups", new security groups can be created (1).
Each newly created Security Group needs a name (2), a description (3) and an ID (4). It is possible to define inbound and outbound rules separately (5 & 6). Each rule consists of its type and protocol, the affected port range, the origin and a short description of the rule.
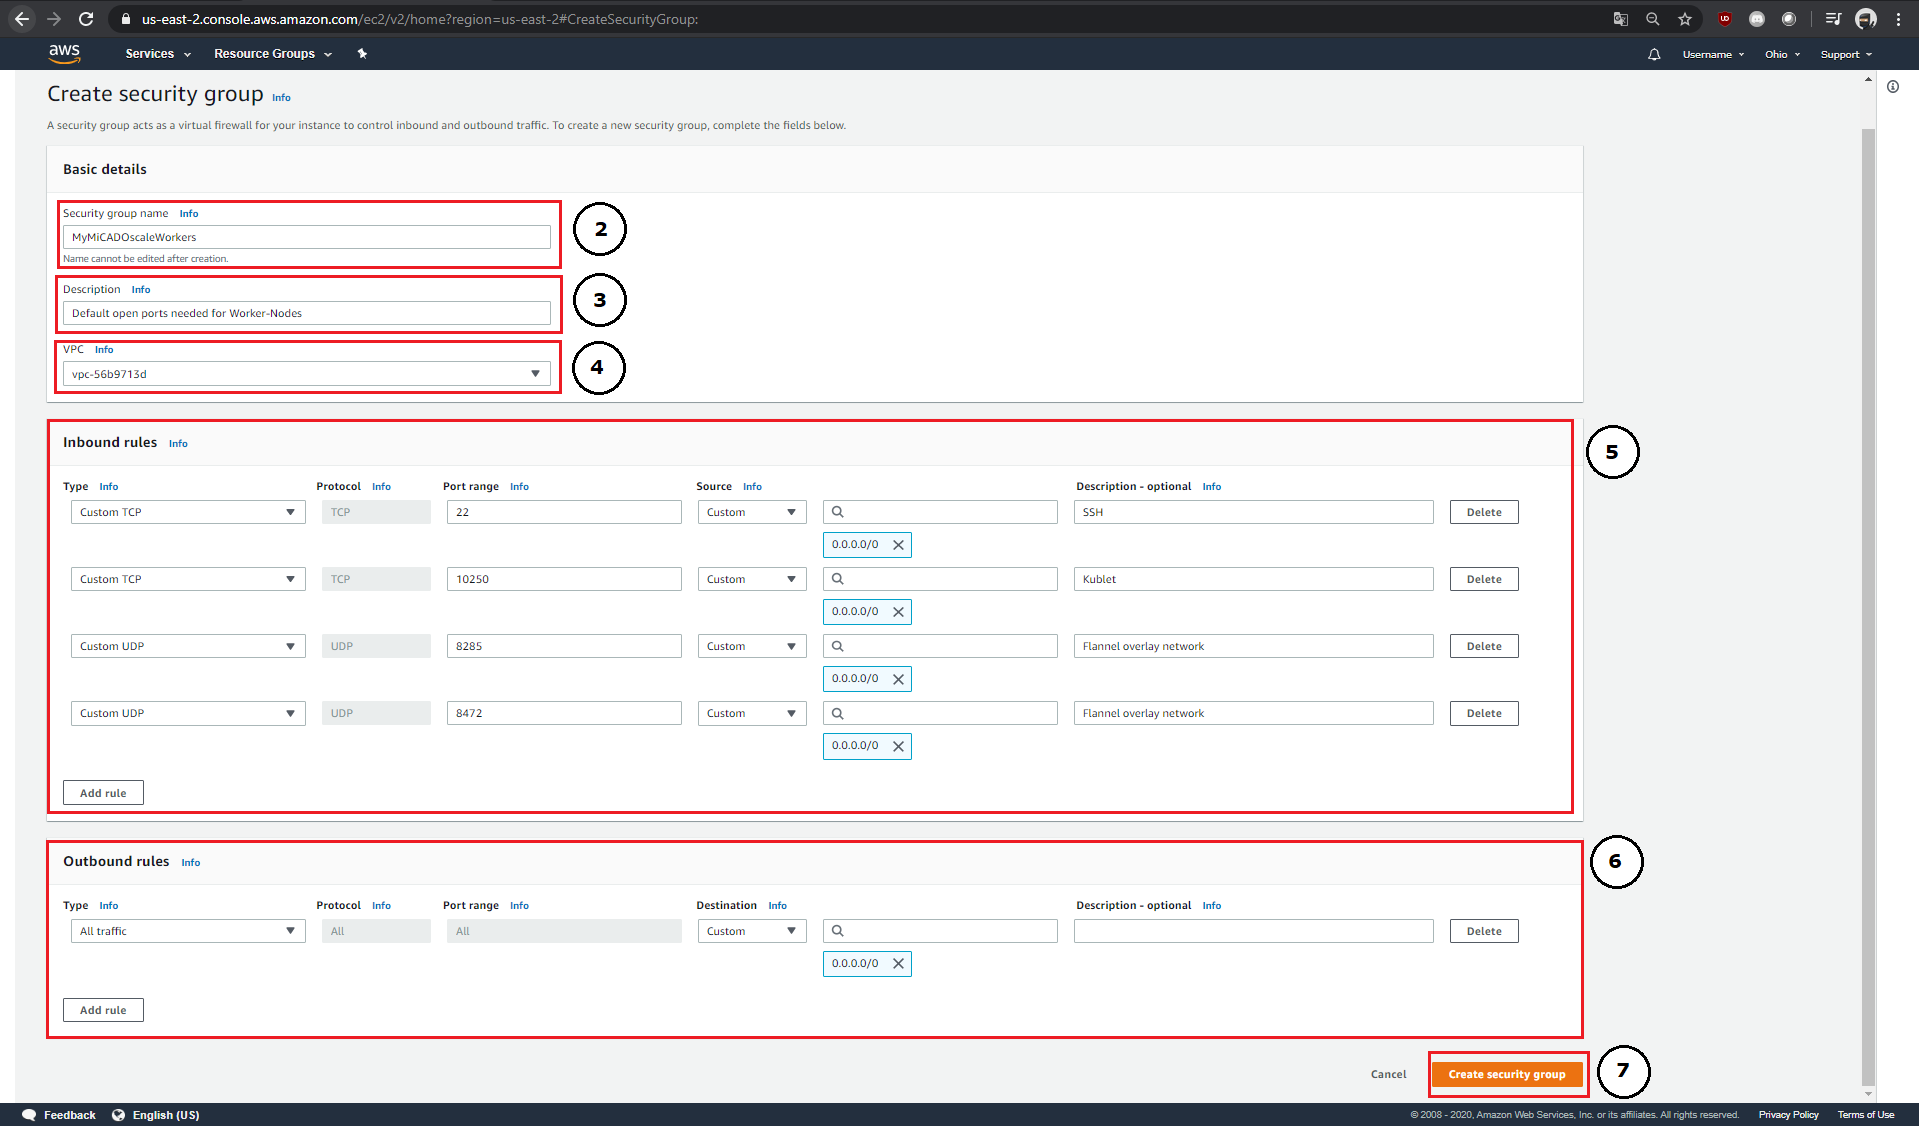
After the rules have been added to the Security Group, you can then create it (7) and copy its Security Group ID (8) and add it to your ADT.